Wednesday, October 14, 2015

Menu Planning from the Pantry

Today as I sat down to make a list from the grocery ads I received yesterday, I realized that I probably didn't need to be buying groceries this week due to having enough in our larder and the sales not being that good this week. (Except for a pumpkin since they are $2.68 this week and I promised my kiddos I would buy one and probably some milk and eggs.)

So I thought I would blog about it, just in case some of you were lacking inspiration from your current pantry/freezer this week or were maybe just dreading the grocery store!

I have accumulated three frozen, whole raw chickens in the freezer. Also, I precooked 5 lbs of venison last week and only needed one (freezing the rest), so I will use that burger in this week's bbq burger pockets and chili. Also potatoes were on sale the week before last, enticing me to buy 15 lbs, which I will use for diced rosemary potatoes and loaded baked potatoes. Therefore, I decided to do a meal plan where our dinners center on those this week. (And yes, I realize that today is Wednesday and we are technically halfway through the week, but I like to have our week run Thursday to Wednesday for menus since Wednesday is when the new sales start in my town.) The rest of the produce was either on sale the week before last as well, or I had it in the freezer. (I chose not to shop last week as well due to the vast amount of produce deals I found 2 weeks ago.)

So here is what our dinners will look like this week:

Today:         (Last things left from our menu from last week)
                    BBQ Burger Pockets, Broccoli and Cheese Soup

Day 1:         Baked Chicken, Diced Rosemary Potatoes, Dessert
Days 2/3/4: Chicken Tacos w/ Homemade Refried Beans
                    Chicken and Stuffing Casserole, Green Beans
                    BBQ Chicken Pizza, Corn
Day 5:         Chicken Soup and Homemade Crusty Bread
Day 6:         Chili, Crackers, Carrots
Day 7:         Loaded Baked Potatoes topped with Chili, Baked Brussels Sprouts

Now, normally we have a less regimented week. I like to be able to pick and choose what to eat either the night before or the morning of. But, for the sake of budgeting, I am working with meals this week that build on our leftovers to make new things and keep everyone interested. For days 2/3/4, we will have whatever sounds best, but for the rest of the week, we will have to stay pretty on schedule. Also, this week I will let the kids each choose a meal to be responsible for instead of letting them plan a meal themselves. Usually it's the other way around, but I wanted to "shop" entirely from our reserves instead of the store. Additionally, while I like to let my kiddos eat until they are full, you will notice I planned dessert for the night that chicken is the main course. That is because I have noticed that they eat less chicken if they are "saving room" for dessert. They will still eat plenty dinner, but they won't gorge on it, just because it tastes good that way and I will have more chicken left for dinners the rest of the week.

For breakfasts/snacks I will have these options available for the kids to grab and go:

Oatmeal
Yogurt
Fresh Fruit (I keep this pre-portioned in sandwich bags in the fridge)
Homemade Granola (For topping yogurt or eating as cereal)
Cranberry Bran Muffins (Baked tonight and portioned 2 per sandwich bag)
Dried Fruit
Peeled Carrots cut into sticks
Bell Pepper Slices
Hardboiled Eggs
Frozen grapes and berries

You may have noticed that I didn't mark a day for eating leftovers. Lately I have been trying to have us eat dinner leftovers at lunch, rather than having a night where we eat leftovers for dinner.

Tuesday, October 13, 2015

Pie Crust

4 cups flour of your choice (I use whole wheat)
1 cup butter or coconut oil
4 TBS milk of your choice
1 TBS coconut sugar (or sugar of your choice) or 1/2 tsp salt, optional (sugar for a sweet pie, salt for savory)

Mix together well until it holds together and doesn't crumble. If it crumbles, you will need to add a little more milk. If you are making a spiced pie (like apple or pumpkin) feel free to add in a bit of cinnamon as well. 

Separate into 2 balls. Spread into a pie pan, or roll out/shape into a circle (on top of a piece of waxed paper). Then gently pick up the waxed paper on one side and carefully roll towards the other side until your pie crust resembles a tube. You can then wrap in plastic wrap and store in the refrigerator or freezer until ready to use. When you are ready to bake your pie, simply remove the plastic wrap and gently roll back out until it is in a circle shape again. You should easily be able to pop it into a pie pan or top a pie with it at this point. 

Apple Pie

2 pie crusts (premade or homemade)
1 or 2 TBS sweetener of choice ( I used honey)
1 tsp of sweetener of choice ( I used date sugar)
A sprinkle of cinnamon

To turn your already yummy crock pot spiced apples into a pie, simply start with an unbaked pie crust. Dump in your quart of precooked Crock pot Spiced Apples. Smooth out to fill the crust. Then since pies are supposed to be a little sweet, I generally drizzle/sprinkle a little (maybe 1 or 2 TBS) of honey, coconut sugar, or date sugar over the top of my apples. Then I topped the apples with the second crust. You could at this point make your crust as fancy or as, let's call it rustic, as you choose. I am impatient and a little lazy so my pie crust was super "rustic". Then I sprinkled on another tsp of sweetener and a bit of cinnamon on top of the crust. Alternatively, you could have mixed these into your crust. Cut slits (or a design if you're fancy) into the top of your crust to allow the heat to vent. 

Now bake in a 375 degree Fahrenheit oven for approx 50 mins or until the crust is nicely browned and the apples are bubbling a bit out of the slits in the top pie crust. I probably tend to over bake mine just a bit, but that's personal preference, so feel free to decrease cooking time by a few minutes if you wish. 

Click Here for Printable Recipe


Sunday, October 11, 2015

Crockpot Spiced Apples

5 lbs apple of your choice
1/4-1/2 cup to taste of sweetener of your choice (I use honey or coconut sugar usually)
1 TBS Cinnamon
2 tsp Allspice (Can Sub 1 tsp Nutmeg, 1/2 tsp Ginger, and 1/2 tsp Cloves)

Wash apples well. Cut apples with apple cutter and throw in an empty crockpot. I leave the peels on for added nutrition, but you are welcome to peel them. Then I add in the sweetener and spices. Cook on High for 2-4 hours or low for 4-6 hours depending on how tender you like your apples. I like mine completely mushy and falling apart. That's it! Easy Peasy.

Thursday, September 3, 2015

Pizza Crust using Pancake Mix!

I made this gem today!

I omitted the parm since we didn't have it and used my own toppings for a more basic version of BBQ Chicken pizza since we have some picky eaters at our house today.  It was delicious and super easy!

You simply mix well:
2 cups of pancake mix
1/2 cup water
1/4 cup oil (I used olive oil)
1 tsp of oregano (I used a combo of Italian herbs)

Then I skipped the extra steps of kneading letting it stand because to be completely honest, I'm lazy and everyone was hungry.

I just spread it in a big skillet (that we took the handle off of years ago so we could bake in it) and baked it for about 10 mins at 425. The crust was golden brown and smelled amazing at this point.

Then I topped it with some bbq sauce, chopped up cooked chicken from my freezer, cheese, a sprinkle of salt, and some more Italian herbs (though I probably could have skipped them since it was pretty herby already). Then I baked it maybe 6 or 7 mins more until my cheese was completely melted and bubbly.

The crust tasted kind of flaky and crumbly. It was kind of like a mix between pie crust and thin pizza crust, but it was really good! Definitely a hit!

Cranberry Bran Muffins

2 cups bran flakes cereal
1 1/4 cup milk (I used soy milk)
1 egg
1/4 cup oil (I used olive oil)
1 1/4 cups flour (I used whole wheat)
1/2 cup sugar (I used coconut sugar)
1/2 cup cranberry sauce
1 tsp vanilla extract
1 TBS baking powder
Pinch of salt

I mixed the milk and cereal and let them sit until mushy, stirring occasionally.  This took probably 20 minutes or so. Then I mixed in everything else. I filled muffin pans 2/3 full with batter and baked for approx 20-25 mins at 400 degrees Fahrenheit. This recipe made 12 muffins.

I plan to try this again subbing in pumpkin or banana for the cranberry.  So yummy!

Please note: This recipe was created using the original all bran muffins recipe as a base line and then modified to work for my family.

Friday, July 10, 2015

How I Meal Plan

Here in our house we tend to be creatures of habit. Unfortunately, that gets boring very quickly! So I tend to look out for new recipes to try, usually about one a week. If everyone likes it, it makes it to the "Our Favorite Meals" list. (I use this printable from Lulebellelaine to record these, found here. This makes deciding on meals, a whole lot easier, especially since it lists which ingredients I need in order to cook that meal.
(Don't mind all the splotches on our meal list. Those were from before I got wise and put them in sheet protectors.)

My usual OCD self takes things one step further by having a small desktop basket of color coded craft sticks with meals written on them. This makes deciding what kind of meal to make on a certain day a little bit easier. For example, if I know that we will be out late on Wednesday night, I know I need to grab a green stick (Easy 10 minute or less meal) or a blue stick (crockpot meal) for that day so we don't resort to eating out. Now technically, it would be just as easy to make a list of each of these meals on a printable like this, but I like colored things and I like handing the kids a few sticks and letting them pick one instead of letting them touch my list of meals with their grubby little fingers. 

Now, I also do make sure that most weeks, each kiddo gets to be in charge of one meal. The bigs are able to handle a meal from start to finish, but the littles get to have me as their "helper" for their meal night. This process starts the week before and includes them checking what we have planned on the calendar for that day, deciding on an appropriate meal, making a list of what we would need to purchase for that meal after taking note of what we already have, and adding it to the grocery list. Then for their day, they are responsible for making sure whatever they need is thawed out the night before and then throwing everything in the crockpot in the morning on low or being in the kitchen at a decent time and making sure dinner is on the table by dinner time. No, this has not always been gourmet meals, but it has usually been edible and it teaches them valuable life skills that ensures they won't be in their dorm rooms or first apartments eating nothing but macaroni and cheese, peanut butter sandwiches, and ramen. And it saves me from cooking at least 2 nights a week. Plus its ends up being good one-on-one bonding time with each of the littles which sometimes can be in short supply when you are one of many. 

We also sometimes make crockpot freezer meals ahead of time, but I have found that for us, it's just as easy to throw all of the ingredients in the morning of, then to have a day long cooking marathon. But that being said, I do freeze certain things pre-prepped to be meal ready. For example, our freezer contains meal portioned, precooked freezer bags of cooked ground meat, cooked beans, cooked diced or shredded chicken, some pre seasoned with just basic seasonings and some pre seasoned with Mexican or Italian seasonings. I also tend to prep certain veggies that are starting to get wilty in the fridge before they go bad like blanching and freezing cut carrots or broccoli. We use fajita vegetables a LOT because they are a staple ingredient in most East African meals, so I frequently sautée tons of bell peppers, onions, and tomatoes when I'm  making some for just one meal and freeze the extra in meal portioned bags. Also I usually chop or blend any herbs I buy after using them for one meal (like basil or cilantro) and freeze them in ice cubes trays so the rest don't get wilty in the fridge. Then once frozen I pop them out into a zip lock bag so I can use just a cube or two in crockpot meals, soups, casseroles,  etc.  Another thing I do is cut green onions into meal ready pieces and pop them into an empty Mason jar or water bottle in the freezer and just shake a few out to top tacos or baked potatoes or whatever I need them for. 

When it comes to the actual meal plan though, I tend not to pick a certain meal for a certain day unless one of the bigs specifically asked for a certain day to cook because they are really busy that week or in the case of the "I know we will be out late on a certain day" scenario. Instead we pick 6 dinners (1 night is left over night) and put them on the list. I use Mommy Goes Green's printable here for just this reason. Then on that day or the night before, I pick a meal to cook. I don't like to be tied down. ;) I also go through and make sure there are a few breakfast, lunch, and snack options and then put them on this list so the kids don't tell me that they are starving and ask what's for breakfast. Instead they check the list and pick an option.

Now a good meal planning tutorial would also tell you that it is crucial to keep a pantry, refrigerator, and freezer inventory, but I seem to be unable to keep up with this, so instead I just keep all of my food items organized very well so you can see what we have easily when you look. I bought little containers and baskets from Dollar Tree and labeled them for the fridge 

and freezer 

and instead of using a regular shelf or cabinet for pantry items, I use basket shelves 
so that all of my pasta sauce is together, all of my dried pinto beans are together, all of my backup condiments are together, and so on and so forth. 

Hope this helps! Feel free to comment or message me with any questions.

Thursday, June 11, 2015

Mexican Crockpot Mixup

5 cans enchilada sauce
2 Cans Tomato sauce
1 cup of white rice
1.5 lbs cooked chicken
1-1.5 cups black beans
1 can corn
2-3 cups sautéed onions,  tomatoes, & bell peppers
Salt to taste

Combine in crockpot on high for 4-6 hours. Stir every hour or so.

Awesome served with cheese, sour cream, avocados, and tortilla chips. Or even just in a tortilla!

Friday, June 5, 2015

Homemade Powdered Laundry Detergent

Homemade Powdered Laundry Detergent
I was feeling too lazy to make my normal liquid laundry detergent,  so I decided to try something new. I found some recipes online, but the ones I found were all large batch and I wanted to try a small batch to see how it worked for me before I committed to a 5 gallon buckets worth.  I also wanted to add some stain stick for extra stain fighting since my monkeys usually end up covered in mud or grass or food by the end of the day. So here's what I came up with.
1.5 cups borax
1 cup homemade washing soda
1/2 cup baking soda
2/3 cup soap mixture
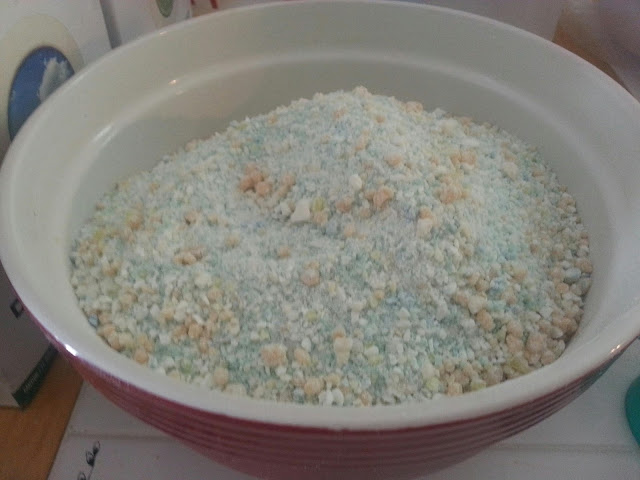
I just mixed these all up and voilà!  Homemade laundry detergent. You use 2 TBS per load. 
The hardest part was making the soap mixture,  but I made up a huge batch of it so I could use it to quickly make up more dry detergent or even to make liquid detergent if I don't end up liking the powdered.
Here's how I made the soap mixture:
I took 9 bars of random soap from around the house and chopped them into smaller chunks.  Then I blended them into fine bits in 3 different batches in the food processor.  To keep it from sticking to my blades too much,  I added in 1/3 of a small 14 oz box of baking soda with each batch of soap chunks (so 1 box total).
Then I took 3 Buncha Farmers stain sticks and chucked them up as well and tossed them in the food processor.  These were softer and ended up beading up like beeswax granules.
Then I added the soap/baking soda bits to the stain stick granules and added in an 18 oz bottle of Purex Crystals.
I mixed these all up and stuck them in a separate container with a lid.

Homemade Powdered Laundry DetergentUpdate: I have been using this detergent for about 4 and a half months now. I am really happy with it. I have noticed on any laundry that has something in the load that is stinky or extra gross (read sweaty football uniform), I do tend to add 4 TBS instead of 2. This ensures that there is no leftover stains and everything smells nice and clean.

Printable Version of Recipe Here

Do you make any of your own homemade cleaners? Please comment below if you have a good recipe I should try! 

Wednesday, March 4, 2015

Chicken Soup

I have finally perfected my chicken soup recipe! This recipe has just the perfect blend of herbs and spices. 

1 onion, chopped
1-2 TBS minced garlic
Evoo
Salt and pepper
About a cup of cooked chicken, diced
2 cups (or 1 can) of carrots 
1 lb speggetti noodles, broken OR
1 lb of egg noodles
1 TBS minced ginger
Pot full of chicken broth
2 TBS fresh or 2 tsps dried of both basil and thyme
1 tsp each of sage and turmeric

Start by sautéing the chicken, onion, garlic, and ginger in evoo on medium. Once the onions are translucent, fill the pot full of chicken broth and set the burner to high. To the chicken broth, add the carrots and the remaining spices and herbs. Bring to a boil. Once the broth is rapidly boiling, break the speggetti noodles into approx 2-3 inch segments and drop them in the pan (or add the egg noodles). Adjust heat to medium high to avoid boil-over. Cook until noodles are tender. 


This recipe made just short of 4 quarts of soup. 

Note: Sometimes when the noodles are tender, I will also add biscuits to make this into a type of mock chicken and dumplings. To do that, I simply cut the cheapest, regular biscuit dough you can buy in a refrigerated tube into quarters with scissors. Then you drop them one at a time into the boiling water. I boil for around 3-5 minutes more after dropping my last quartered raw biscuit. 
If you use the expensive biscuits (like grands), these usually don't turn out well. They end up kind of slimy. Seriously, use the 25-or-30 cents-a-roll kind. 


Shepherd's Pie

So somehow I had made it through all of my thirty something years without ever having the deliciousness that is Shepherd's Pie. Today I was looking for a recipe to use up instant mashed potatoes (because somehow, even though I never buy these, we ended up with 3 boxes). And I came across the idea of Shepherd's pie. Of course I am not one to follow a recipe, so instead I read the general description on Wikipedia and decided to create my own version. This is what I came up with. (Bare in mind that my version feeds a small army, so feel free to half it.)

2 lbs ground meat (I used venison)
2 chopped onions
1-2 TBS Minced Garlic
Evoo
Salt and pepper
2 cups (or 1 can) of sliced carrots
2 cups (or 1 can) of peas
2 small cans of tomato sauce
10-12 cups of Mashed potatoes
Cheese

So first I just browned up the ground meat. As it was browning, I chopped up a couple of onions and threw them in with the meat. I added some evoo since venison can tend to be pretty dry. I also added the garlic, salt and pepper. 
(If I had used a different ground meat, I would have drained it at this point. Because it was deer, I didn't really have anything to drain off of the meat/onion/garlic mixture.)
When that was all browned, I added in the peas, carrots, and the 2 cans of tomato sauce.
Then I split the meat and veggie mixture between two silicone cake pans. 
I set those to the side and made up 2 batches of mashed potatoes, using buttermilk instead of milk (because it's yummy and because we were running low on milk). 
When the mashed potatoes were finished, I split them evenly over the two cake pans and mushed them down (loving my technicality, right) over the meat and veggie mixture. 
On top of that I crumbled slices of still kind of frozen cheese. (Because I'm a last minute planner and that's how I roll.) Turns out slightly frozen cheese slices crumble pretty easy so it worked out just fine. 
Then I put the pans on cookie sheets and popped them in the oven on broil. Just until the cheese was nice and melty and kind of browned on top. 

And here's what it looked like once it was cut in to.
It was super filling and the kids all went wild for it. We will definitely be making this again!

Sunday, January 25, 2015

A1 Original Steak Marinade Review

DH decided to BBQ today out of the blue and surprise, surprise..I hadn't anticipated defrosting meat because it's January and I had planned on making Beef Stew today. But not to worry, because I am frequently unprepared and forget to pull meat out of the freezer ahead of time, so I knew just what to do. I figured it would be the perfect excuse to try out this A1 marinade packet I've been dying to use! 
The instructions are fairly self-explanatory.  I mostly followed them, using the white vinegar because I didn't see my red wine vinegar within the first 30 seconds of looking and of course I used evoo. 
I was kind of expecting it to look darker colored like A1 sauce and the color that it did look like was not that appetizing, just to be honest, but the show must go on!
I mixed it up well and then stuck my frozen steaks straight in the marinade, sealing it up and smooshing the marinade all over the steaks so they were covered in this brown goopy stuff. 

Then I stuck the bag in a bowl of cold water on the counter to help it defrost. 

Once defrosted, hubby grilled these bad boys up. 

But, I have to say that the seasoning left much to be desired. It wasn't bad. It just wasn't knock your socks off good. I actually prefer my homemade steak rub. I love love love A1 steak sauce so I bought 2 of these. Now I'm kind of thinking I will just use the other packet as a meat rub and call it a day, but I can definitely say I'll not be buying this again.


Friday, January 23, 2015

Mojito Lime Chicken

Add 2 TBS water, 1/4 cup evoo, a packet of Mojito lime McCormick grill mates, and 2 TBS of white wine vinegar. Add in 2 lbs of chicken. Mix to coat chicken well.

Can be frozen at this point. When ready to eat, just grill or bake at 375 degrees until fully cooked. Awesome over rice.

Bruschetta Chicken

Add 1/3 of a cup of evoo to a gallon freezer bag. Add in one pkg of McCormick gourmet sweet basil & oregano Bruschetta Chicken recipe and seasoning mix. 
Add in 1 lb of chicken. I chose boneless, skinless chicken thighs. 
And 1 big can with juice (approx 28 oz) or approx 2 lbs fresh (around 10) plum tomatoes, quartered.
Then add in a TBS of balsamic vinegar.

Seal and mix well.
At this point, it can be frozen if you are making the freezer meal version.
Add to a baking pan and bake at 425 degrees for approx 30 minutes. 
Meanwhile, cook and then drain a pkg of speggetti or angel hair pasta or start a batch of rice in the rice cooker. 
When chicken mixture is cooked and cool enough to handle, cut chicken into bite size pieces. As you can see from the picture, it will be a big soupy, delicious mess when it's finished.

Toss with the pasta and sprinkle with a little parmesan, if desired or serve over rice.
Delicious! Even my kiddo that's a tomato-hater always asks for seconds. 

Tandoori chicken

We have a rather large family, so this is a fairly large batch. Feel free to half this recipe or freeze half the batch as a freezer meal. 

First I started with about 2/3 cup plain yogurt. 
Then you add in 4 tsps each (or in my case about 2 small glugs each) of lemon juice and olive oil.
Next, you add 2-3 TBS of tandoori seasoning. 
You can make your own if you wish. (Post soon to follow.) But to give you some kind of idea, this is which spices my store bought spice mix contains.
Then add a sprinkle of salt and mix well. 
I then added in 12 chicken legs. (Which is 1.5 of the bags of frozen chicken legs that Aldis sells, just FYI. I always buy 3 bags and that equals 24 drumsticks, which I just split in half for 2 meals. These bags are only $2.69 at my Aldi.)
Then you mix well, making sure all the chicken is well-coated (because the yogurt helps tenderize the chicken while the spices amp up the volume). It ends up looking something like this.

I let it sit in the refrigerator like this for 2-3 hours or overnight if I'm actually planning ahead. (At this point you could freeze half the batch in a gallon freezer bag if you so desired.) 
Oh and quick note, I never remember to defrost meat ahead of time so my chicken usually goes in frozen and defrosts in the marinade.
After it's done marinating, I give it a good stir and pop the entire contents of the bowl in 2 square silicone pans. Feel free to use pans of your choosing or even stick them on the grill. I just like the way silicone pans never have to be scrubbed too hard so I use them for almost everything.

Bake at 425 degrees for 45 mins to an hour or until done to your liking. At my house that means well, well done, hence the very crispy chicken in the picture. Feel free to cook yours to your family's specifications. 

And if you can't tell from my plate, this chicken is lovely with jasmine rice soaked in the leftover marinade/juices in the pan. So, so yummy!